Book Free Session on WhatsApp or Call   +91  77000  04970

Queries Related To Aligner Sitting

When inserting each aligner gently push the aligner over the patient’s front teeth then apply equal pressure using your fingertips on the occlusal surface of the patient’s left and right posterior teeth until the aligner fits into their place. After the aligner fits perfectly in posterior teeth apply gentle pressure in the anterior region for proper fitting of the aligner.

Chewies are also used to help aligner sit in place. Instruct the patient to bite on the chewy gently starting from posterior teeth followed by premolars and lastly in anterior teeth. This assures that aligners are fit properly in place.

 To remove aligners, on one side of the patient’s mouth, insert the fingertip on the posterior region to slowly pull the aligner from the molars. Repeat this process to the other side of the patient’s mouth before trying to completely remove the aligner. Once the aligner is disengaged from the molars on both sides, you should be able to slowly work your way forward with your fingertips to remove the tray completely.

You can also use aligner removal tool to remove the aligners. This is double sided instrument which has one end with a U-shaped hook designed to engage the edge of the aligner at gingival level and remove it with a pulling motion that is downward. This end is used to remove the upper aligner. Other end has lever which help pushing off the lower aligner, engage the lever end between the aligner and teeth and push it upward.

Chewies are soft plastic cylinders that are about the size of cotton roll. They are used to help seat aligner in place.

After you put the aligner in patient’s mouth, you instruct them to bite down on the chewy first on posterior teeth moving on to premolars and then anterior teeth. This repeated biting action helps the aligner to better conform to the shape of your teeth.

The proper fitting of an aligner is essential for effective treatment. Because chewy can help improve an aligner’s fit, using them can help ensure that the treatment proceeds as planned. A properly fitting aligner should cover the teeth and fit tightly on the patient’s teeth.  Wearing aligners that don’t fit snugly over the teeth can slow treatment. This is why chewy is used for proper fitting of the aligner.

Zero stage aligners are part of set aligners. These are given to ease the patient’s way into the treatment and to check the accuracy of the impression.

It is a passive aligner customized to fit the teeth in the right way to get accustomed to the further set of aligner. It is given to check the fitting of aligners over the patient’s teeth. And for the patient to get use to the aligners on how to remove the aligner and how to place it over the teeth.  These set of aligners are given for the patient to get comfortable with it.

They should be worn for 22 hours in a day and is given for two weeks. They should be removed while eating, brushing and flossing. These set of aligners ease the patient’s worry before starting the actual aligner treatment.

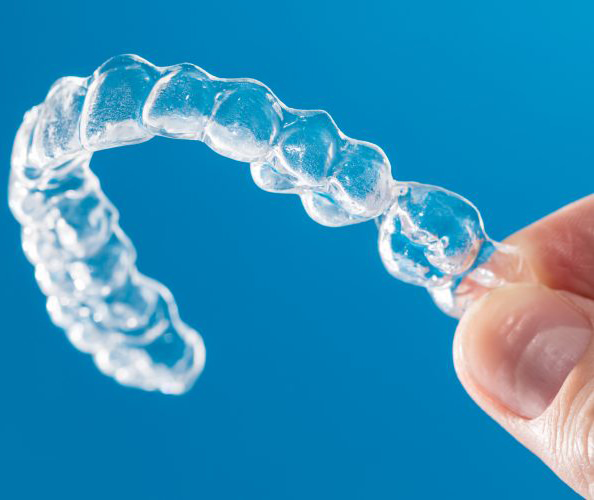
·       Attachment Template fitting

When you receive a clear plastic template. First you need to check the fitting of the template over the teeth of the patient.

Attachment template look a lot like the normal aligner, with the exception that it will have small bulges in it, that corresponds to specific locations on specific teeth, where the attachments are needed to be placed.


·       Preparing tooth surface

You have to clean and prepare the surface of the tooth. The first step involves etching the tooth’s exposed surface. The etchant is spread over the tooth surface where the bonding will be placed. It is allowed to sit for at least 15 seconds or more and then washed thoroughly. The surface is now prepared and ready for the next step that is bonding.


·       Bonding agent application

The bonding agent is applied on to the etched tooth surface using an applicator, you can also blow air gently over the tooth to ensure that the bonding agent has been dispersed as a thin even layer over the tooth’s entire preparation and etched surface and cure it.


·       Filling the attachment template

Fill the bulge with composite in aligner template. The shape of the bulge will create the shape of the attachment being placed. Pick the shade of composite that matches the patient’s teeth as closely as possible.


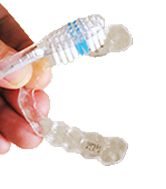
·       Curing the attachment

The filled template is seated over the patient’s teeth and cure it. Once it is hardened, remove the template and trim away the excess and the new attachments are ready.

It is very rare that aligners don’t fit. If in case it occurs then first assure that it is fitting or not properly. To check the fitting place the aligner in patients mouth and start applying pressure from posterior teeth followed by premolar teeth and lastly anterior teeth. Make sure that aligner tray covers whole surface of teeth such that no gap is seen incisally and near gingival sulcus. If this method doesn’t work then use chewy to place aligner properly in its place.

Possible reasons for improper fitting of the aligners are as follows:

·       If there is gap of more than 1mm between the teeth and the aligner

·       If aligner is lifting from posterior teeth


If the aligner is not fitting properly then you need to repeat the impression and send it back to the aligner company, it is better to repeat the intra-oral photographs as well as wax bite and get the new aligners fabricated.

Please note that, procedures which involve tooth modification such as restoration, root canal treatment, veneers and laminates, crown and bridges etc. should not be done after you have started with aligner treatment. This is because it can alter the fit of aligners as these procedures involve change in the tooth structure. 

Aligners shouldn’t be too tight or too loose. Patients should remain aware that aligners tend to feel a little tight at first. There should be no space between the trays and the incisal edges of the teeth. Space or gaps typically indicate that the trays are too big or too little.

When patients leave out their aligners for too long, the teeth will begin to shift back into their original positions. In some instances, your aligners may not fit correctly it you try to place them back over your teeth. One of the benefits of aligners can be removed from time to time.

Patient should wear your aligners at least 22 hrs. Per day. If patient is not using it properly the treatment duration will be prolonged and your clinical visits will be increased.

When patient come to the clinic ask him/her for placement and removal of the aligner if he/she is doing it properly that means patient are using it properly.

If the patient is changes aligner set every after 15 days that means patient worn the aligner for 22 hours per day. And if patient is not using aligner set for 22 hours per day patient will not able to change the her next aligner set.

If there is no staining on patients previous aligner sets its shows that patient maintain his/her oral hygiene properly.

First check the patient aligner wearing schedule

As the period of time recommended by each aligner tray normally is 2 -3 weeks before switching to new aligner. To get a positive result with aligners the aligner tray should be worn for at least 22 hours a day. If the patient is ready to come for the next appointment after 15 days then we have to deliver only one set of aligner and if patient is not able to come after 15 days or more then we have to deliver the more sets of aligner.

Aligner trays are designed in manner to move the teeth at maximum of 0.25 to 0.3 mm over a period of two week and it’s worn in a specific sequence.

The aligner trays are only effective during the time they are in physical contact with teeth. So the trays are worn for at least 20 to 22 hours per day. Patient should wear it 20-22 hours per day then only patient is able to change his/her next set of aligner otherwise aligner set will not be fit and treatment duration will be increased.

If he/she frequently removing aligner from mouth then biologically tooth movement will be affect on teeth.

 Some patients might feel difficulty in removing aligners, mainly because they are not used to it.

Some find it uncomfortable placing their fingers in their mouth to remove the aligners. They feel like they cannot find a place to hold grip onto the aligner for easy removal from mouth.

Solution for this is – aligner retriever tool.

This is double sided instruments which has one end with a U – shaped hook designed to engage the edge of aligner at the level slightly below your gum line and remove it with a pulling motion that is down and off

(Don’t pull it outwards). you may loosen aligner in one or more places before pulling it off. This end is used to remove upper aligner.

Other end has lever which helps pushing off your aligner. Engage the lever end between your aligner and teeth and push it up and off (don’t pull outwards).

This tool safely and easily removes aligners thereby preventing unwanted aligner tears and does not damage or break fingernails while removing it.